rakhi making ideas :Creative Rakhi Making Ideas: DIY Your Love This Raksha Bandhan

    Creative Rakhi Making Ideas: DIY Your Love This Raksha Bandhan

  1. Creating a Rakhi at home is a beautiful way to celebrate the festival of Raksha Bandhan with a personal touch. Handmade Rakhi not only adds a unique charm to the occasion but also allows you to express your love and creativity. In this article, I’ll guide you through the process of making a Rakhi at home with easily available materials, while also explaining some tips to make it beautiful and special.

Materials Needed to Make Rakhi at Home

Before we get started, here’s a list of materials you’ll need to make a simple yet elegant Rakhi:

  • Silk thread (Mouli or any colorful thread)
  • Beads and pearls (of various sizes and colors)
  • Felt fabric or small decorative patches
  • Glue or hot glue gun
  • Scissors
  • Decorative items like sequins, mirrors, stones, or small embellishments
  • Cotton or wool (for the base)
  • Ribbons or satin strips

Step-by-Step Guide to Making Rakhi

Step 1: Preparing the BaseThe base of the Rakhi is crucial as it holds everything together. You can create a base using felt fabric, wool, or even a small decorative patch. Here’s how to make a basic base:

  • Option 1: Woolen Base
    Take a bunch of wool or cotton and roll it into a small circular ball. Flatten it gently to form a disc-like shape. This will be the base for your Rakhi.
  • Option 2: Felt Fabric Base
    Cut a small circle (about 1-2 inches in diameter) from the felt fabric. This will serve as a sturdy base where you will glue beads and other decorations.

Step 2: Decorating the BaseNow that your base is ready, it’s time to decorate it with beads, pearls, and other embellishments.

  • For a Simple Beaded Design:
    Apply some glue to the center of your base and arrange beads or pearls in a pattern. You can create concentric circles or a flower-like design, depending on the size of the base. Use small stones or sequins to add extra sparkle to the design.
  • For an Intricate Design:
    Add decorative patches or mirrors at the center of the base. Around this, create a ring of small beads or tiny flowers made from fabric or ribbon. This will give your Rakhi a more intricate and traditional look.

Step 3: Attaching the ThreadOnce your base is decorated, the next step is attaching the thread that ties around the wrist.

  • Take a bunch of silk thread (about 20-30 strands) and fold it in half. The length should be long enough to comfortably tie around the wrist, usually around 10-12 inches.
  • Tie a knot at the folded end, leaving a loop at the center. This loop will make the Rakhi easy to wear.
  • Glue the knotted end of the thread to the back of your decorated base. Ensure the thread is securely attached. You can also stitch the thread to the base for added durability.

Step 4: Adding the Finishing TouchesYour Rakhi is almost complete! Now, it’s time to add some final decorative elements to enhance its appearance.

  • Use satin ribbons to wrap around the thread on either side of the base to give it a smooth and shiny finish.
  • You can also glue tiny sequins or small decorative elements on the thread itself to make it more festive.
  • If you want a floral touch, make small fabric flowers and attach them near the base of the Rakhi.

Step 5: Letting It DryOnce all your decorations are securely in place, allow your Rakhi to dry completely. It usually takes about 10-15 minutes if you’re using quick-drying glue. Ensure everything is firmly attached before gifting or wearing the Rakhi.

Tips to Personalize Your Rakhi

  1. Use Photos: You can make a photo Rakhi by adding a tiny picture of your sibling at the center of the base. Use transparent plastic to protect the photo.
  2. Themes: Choose a theme based on your sibling’s favorite things. For example, you can create a Rakhi with superheroes, sports elements, or even a favorite color scheme.
  3. Add a Scent: Dab a drop of your sibling’s favorite essential oil or perfume on the thread to give the Rakhi a fragrant touch.

Creating your own Rakhi is a wonderful way to add personal meaning to this cherished festival. Enjoy the process, and happy Raksha Bandhan

here is a YouTube channel for help
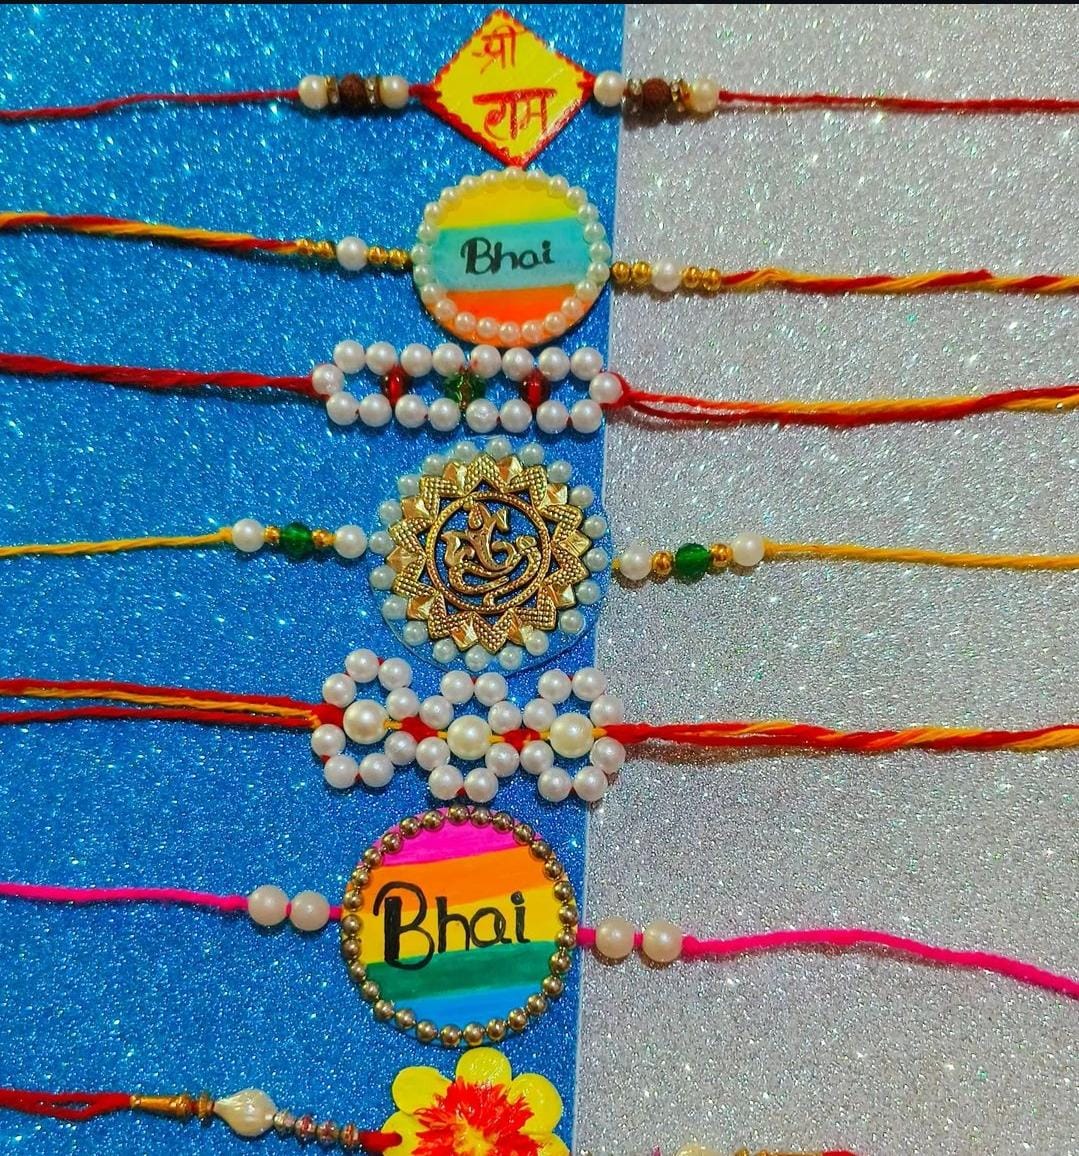
Creating a Rakhi at home is a beautiful way to celebrate the festival of Raksha Bandhan with a personal touch. Handmade Rakhi not only adds a unique charm to the occasion but also allows you to express your love and creativity. In this article, I’ll guide you through the process of making a Rakhi at home with easily available materials, while also explaining some tips to make it beautiful and special.

Materials Needed to Make Rakhi at Home

Before we get started, here’s a list of materials you’ll need to make a simple yet elegant Rakhi:

  • Silk thread (Mouli or any colorful thread)
  • Beads and pearls (of various sizes and colors)
  • Felt fabric or small decorative patches
  • Glue or hot glue gun
  • Scissors
  • Decorative items like sequins, mirrors, stones, or small embellishments
  • Cotton or wool (for the base)
  • Ribbons or satin strips

Step-by-Step Guide to Making Rakhi

Step 1: Preparing the BaseThe base of the Rakhi is crucial as it holds everything together. You can create a base using felt fabric, wool, or even a small decorative patch. Here’s how to make a basic base:

  • Option 1: Woolen Base
    Take a bunch of wool or cotton and roll it into a small circular ball. Flatten it gently to form a disc-like shape. This will be the base for your Rakhi.
  • Option 2: Felt Fabric Base
    Cut a small circle (about 1-2 inches in diameter) from the felt fabric. This will serve as a sturdy base where you will glue beads and other decorations.

Step 2: Decorating the BaseNow that your base is ready, it’s time to decorate it with beads, pearls, and other embellishments.

  • For a Simple Beaded Design:
    Apply some glue to the center of your base and arrange beads or pearls in a pattern. You can create concentric circles or a flower-like design, depending on the size of the base. Use small stones or sequins to add extra sparkle to the design.
  • For an Intricate Design:
    Add decorative patches or mirrors at the center of the base. Around this, create a ring of small beads or tiny flowers made from fabric or ribbon. This will give your Rakhi a more intricate and traditional look.

Step 3: Attaching the ThreadOnce your base is decorated, the next step is attaching the thread that ties around the wrist.

  • Take a bunch of silk thread (about 20-30 strands) and fold it in half. The length should be long enough to comfortably tie around the wrist, usually around 10-12 inches.
  • Tie a knot at the folded end, leaving a loop at the center. This loop will make the Rakhi easy to wear.
  • Glue the knotted end of the thread to the back of your decorated base. Ensure the thread is securely attached. You can also stitch the thread to the base for added durability.

Step 4: Adding the Finishing TouchesYour Rakhi is almost complete! Now, it’s time to add some final decorative elements to enhance its appearance.

  • Use satin ribbons to wrap around the thread on either side of the base to give it a smooth and shiny finish.
  • You can also glue tiny sequins or small decorative elements on the thread itself to make it more festive.
  • If you want a floral touch, make small fabric flowers and attach them near the base of the Rakhi.

Step 5: Letting It DryOnce all your decorations are securely in place, allow your Rakhi to dry completely. It usually takes about 10-15 minutes if you’re using quick-drying glue. Ensure everything is firmly attached before gifting or wearing the Rakhi.

Tips to Personalize Your Rakhi

  1. Use Photos: You can make a photo Rakhi by adding a tiny picture of your sibling at the center of the base. Use transparent plastic to protect the photo.
  2. Themes: Choose a theme based on your sibling’s favorite things. For example, you can create a Rakhi with superheroes, sports elements, or even a favorite color scheme.
  3. Add a Scent: Dab a drop of your sibling’s favorite essential oil or perfume on the thread to give the Rakhi a fragrant touch.


Creating your own Rakhi is a wonderful way to add personal meaning to this cherished festival. Enjoy the process, and happy Raksha Bandhan!

IMAGE CREDIT TO – SUMAN ART AND CRAFT [YOUTUBE/INSTA]
LINK – https://www.youtube.com/channel/UCT2tYLJPeZnOtqs2QCAXIZQ

Related Post

Leave a Reply

Your email address will not be published. Required fields are marked *